

One of my absolute favorite ways to make math easier for the kids I work with is to use manipulatives! Manipulatives are simply materials that kids can actually move or “manipulate” as they work through their math problems to help them actually see the math that they’re solving. They’re visual cues or prompts that help explain the conceptual material the child is trying to learn.
When using math manipulatives, it helps to pick materials that are of interest to the learner. If someone is super into creepy crawlies, I go to the dollar store and buy plastic bugs. For my vehicle lovers, I pull out my old matchbox cars. Although using materials that are related to a child’s specific interests certainly isn’t mandatory, it will definitely increase your child’s interest in the activity and motivation to complete it! For the items in the pictures throughout this post, I’ve used Shopkins, but remember you can use anything you have available.
Using a few supplies I already have, and a pile of Shopkins, I can work on addition, subtraction, multiplication, or division with my learners. And, with minimal modifications, I can work on these skills with single digit numbers or multi-digit numbers. The options with manipulatives are limitless, making this a great technique for children at a huge range of levels!
For addition and subtraction, I love using lunch trays. If you don’t have access to trays, the dollar store often sells them. You can also take a plate, tray, or even a piece of construction paper and divide it into sections using a permanent marker or masking tape. Using my lunch tray, I put a math flash card in the large part at the bottom and then use the manipulatives to represent the numbers in the top sections. For this activity, you can use store-bought flashcards or simply write out math facts on index cards. Both work perfectly well! I’ll break down the exact step by step process for each math skill below.
ADDITION

In the first picture, you can see that I have the plate all set up for the child to work. In the bottom section, I placed a math flashcard and bin of extra math manipulatives (Shopkins) to keep all the materials organized (but you can just dump your math manipulatives out on the plate, if you prefer!). Working with the child, I’ll prompt him or her to model the math fact with the math manipulatives. The pictured problem is 4+6, so I’ll have the child put 4 Shopkins in the first section and then 6 Shopkins in the next section. I then prompt the child to move both sets of Shopkins into the final section and count how many are there. If the math fact was on an index card, the child can write “10” on it. If not, I may have them write the whole problem on a piece of paper (4+6=10) or just verbally state the answer. Through this whole process we’ve physically modeled that 4+6=10 means you take all the items from 4 and all the items from 6 and combine them to reach 10.
SUBTRACTION

This method works just as well for subtraction too, you just have to tweak the steps! In the picture you can see the flash card says 3-1. So, since it’s subtraction, we start with math manipulatives on the plate and take them off. First, we put 3 math manipulatives in the first section. Then we take one math manipulative off the tray and put it back in the container. This step models that subtraction means removing something. Some children will stop there and count how many are left, some prefer to move the remaining math manipulatives to the final section (like they did in addition) and count there. Either way is fine, just model consistency and have the child do it the same way each time. As with addition, the child can write the answer on the card, write it on a piece of paper, or simply tell the adult.
MULTI-DIGIT ADDITION

When the numbers get bigger, such as two and three digit numbers, I update my lunch tray by labeling it with the hundreds place, tens place, and ones place (you can see the words at the very top of the tray). In my sample, the problem reads 15+41, so I represented each number on the flash card using my tens place and ones place. To make the number 15, I put one math manipulative in the tens place and 5 in the ones place. Then we’re adding 41, so I put 4 more in the tens place and 1 more in the ones place. Once all the items are on the tray, it’s time to check for the answer.
To find the answer, I start by counting the ones place. There are 6 ones, so I’ll write 6 in the ones place of my answer. If you don’t want the child writing on the cards, have a piece of paper for them to write the entire problem on. Next, I count how many tens I have which is five, so I write 5 in the tens place for my answer. My answer is 56.
When you’re using the tray for multi-digit addition, you can remind children that if they have more than 10 Shopkins in any section, then they need to remove them and put one Shopkin in the next section to the left. If I have 10 ones, I’ll take them off and put 1 item in the tens place. If I have 10 tens, then I’ll remove them and place 1 item in the hundreds. This process a great physical way of showing children what carrying our numbers actually means!
MULTI-DIGIT SUBTRACTION
This process will look very similar to multi-digit addition. Begin by placing the math manipulatives on the tray as you did in multi-digit addition. Then, instead of adding the second number, prompt the child to remove math manipulatives to represent the number being subtracted. Have the child count the items remaining, as described above. So if my flashcard reads 47-21, I’d start by putting the items in the tray to represent 47. That means, 4 items in the tens place and 7 in the ones place. Then I’ll take out 2 of the items in the tens place and 1 from the ones place to represent subtracting 21. The child will count how many items remain, 2 in the tens place and 6 in the ones, and get their answer: 26. The problem is solved: 47 – 21 = 26
MULTIPLICATION AND DIVISION
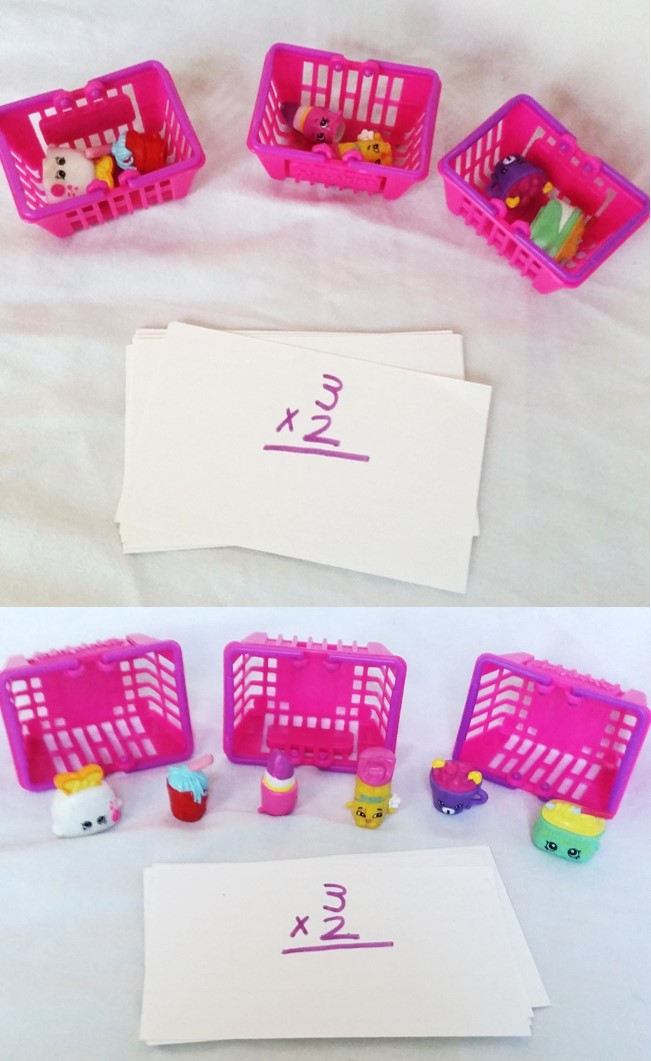
When we get to multiplication and division, I like to use bins or baskets instead of the lunch tray because it’s easier to show the groupings that are happening. For example, the math fact card shows 3 x 2. To model this, I put out three bins then I put 2 math manipulatives (Shopkins) in each bin. The children can then dump out the bins and count how many Shopkins there are altogether, 3 x 2 = 6! If you don’t have cute, matching bins, don’t worry! This works well with plates, plastic containers, bowls, or any other containers you have. The key is that you have the same number of bins as the card states, not that the bins coordinate!
For division, if the card read 6¸2, I would start with 6 Shopkins on the table. I would then explain to the child that 6 divided by 2 means I’m going to put all 6 of my math manipulatives into two bins. I want to split them evenly so first I’ll put one in the left bin, then one in the right bin, then one in the left bin, then one in the right bin, and so on. When all my math manipulatives are used up, I check to see how many are in each bin. The child can count and see each bin had 3 items. 6 ¸ 2= 3!
I use math manipulatives for all types of math, but addition, subtraction, multiplication, and division are four of the easiest ways to use them. The material at this level is still very concrete, so having actual items available can help the child see what the math means. Understanding the concept of 4×5 is tricky, but seeing 4 bins each filled with 5 items, that makes sense!
Using manipulatives for math can help a lot of children who are struggling with the conceptual side of the material. Initially, the adult will need to do a lot of prompting to show the child HOW to arrange and use the math manipulatives, but after a few practice trials, children learn how to move the items around on their own. Some kids eventually fade out of the physical manipulation of materials once they understand the concept, but for some of our more hands-on kids, it can really help to keep math manipulatives around for continued use as the material becomes increasingly difficult!
If your learner loves these hands-on methods for learning, check out some of my other strategies for spelling here and folder tasks here!

2 thoughts on “Using math manipulatives to make learning math so much easier!”